
DRIVERS
HOW TO IDENTIFY THE TYPE OF TECHNOLOGY IN YOUR UNIT:
Locate the zip-tie located on the end of the monitor’s USB cable and refer to the below:
- Blue – IDS Pulse
- Orange – PQ Labs
- Yellow – Next Window 2150 “(End of Life)”
- Pink – Next Window 5200 “(End of Life)”
- Green – 3M DST
Infrared Touch Units (IDS Pulse)
Drivers
Choose the correct download for your OS below:
Windows OS
- For touchscreens with firmware V.2.6.0.2 or higher
- For touchscreens with firmware older than V.2.6.0.2
MAC OS
- For touchscreens with firmware V.2.6.0.2 or higher
- For touchscreens with firmware older than V.2.6.0.2
Linux OS
LED Cell Imaging Touch Units (PQ Labs)
Manuals
Driver, Control Panel and Calibration Utility
Choose the correct download for your OS below:
WARRANTY
Horizon Display Standard Limited Warranty
1) Horizon Display, warrants its products to be free from defects in material and workmanship during the warranty period and subject to the conditions set forth below. Horizon Display warrants its products as to form, fit and function, not a specific application and to meet the performance and testing parameters defined in the product’s associated customer quotation, purchase order and/or contract between Horizon Display and customer. If a product proves to be defective in material or workmanship during the warranty period, Horizon Display, at its sole discretion will repair or replace the product with a similar product provided that a Horizon Display return materials authorization number (RMA) was issued prior to the return of the product. Replacement parts and or units may include remanufactured or product refurbished to manufacturers specifications. The replacement unit will be covered by the balance of the time remaining on the original limited warranty. Warranty period can be found in your original invoice.
2) Horizon Display provides a limited warranty on all custom integrated solutions including; integrated computer products, integrated storage solutions, and integrated display solutions as well as all distributed products including storage and display products. Warranty terms are for repair at Horizon Display’s Integration facility in San Clemente, CA. Freight expense from the customer to the repair depot will be the liability of the customer. The freight expense to return the product back to the customer will be the liability of Horizon Display. The warranty period begins upon the ship date reflected on Horizon Display’s invoice. The balance of the original warranty as detailed in section 1 will cover repairs and or replacements made under the warranty.
3) This warranty is limited to the original purchaser of the product and is not transferable As detailed in section 1, repairs and replacements will be covered by the balance of the time remaining on the original limited warranty. The original Horizon Display invoice must accompany all warranty requests. Horizon Display shall be under no liability at all under this warranty if the total price for the product has not been paid.
4) Warranty period can be found in your original invoice.
5.) Definition of DOA (dead on arrival) – Horizon restricts the DOA period to not exceed 10 days from receipt by the customer. This grace period allows ample time to test product and verify it has been delivered in the condition quoted. If the product fails at any time within this period, Horizon Display is liable for freight charges to return the product and for shipping the replacement/repaired product. If at any time the product is installed, mounted, or altered, the DOA period ends.
6) Horizon Display’s Liability is limited to the cost of repair or replacement of the product. Horizon Display shall not be liable for damage to other property caused by any defects in the product, damages based upon inconvenience, loss of use of the product, loss of time, loss of profits, loss of business opportunity, loss of goodwill, interference with business relationships, or other commercial loss; even if advised of the possibility of such damages. Any other damages, whether incidental, consequential or otherwise, whether arising from or based upon breach of warranty, breach of contract, tort, including negligence, indemnity or any other cause or basis whatsoever limits Horizon’s liability. In no case shall Horizon Display’s liability exceed the original selling price of the products covered under the warranty.
7) Horizon Display’s limited warranty covers only those defects which arise from normal and intended use of the hardware and does not apply for the following:
· Any product on which the serial number has been defaced, modified or removed immediately voids the warranty.
· Accident, misuse, neglect, fire water, lightning, or other acts of nature as well as unauthorized product modification, or failure to follow instructions supplied with the product.
· Repair or attempted repair by anyone not authorized by Horizon Display.
· Damage to or loss of any programs, data or removable storage media.
· Any loss of data or software or data during repair or replacement.
· Any damage of product resulting from shipping if product FOB point of origin.
· Damage from installation or removal of the product.
· Wear and tear deemed normal.
· Physical damage, abuse to the product including theft.
· Improper site and or product maintenance, site preparation, installation misapplication and or negligence.
· Incompatibility due to existing hardware and software.
· Damage as a result of a virus introduced into the product.
· Causes external to the product, such as power fluctuations and or failure.
· Any type of modification or enhancement performed by anyone other than Horizon Display.
8) Defective pixels in LCD panels are not a warranty issue unless they are beyond the criteria presented in the panel
manufacturer’s specifications for pixel defects and or product criteria as detailed in a contract between Horizon Display and
customer.
9) Horizon Display reserves the right to charge a customer a No Problem Found (NPF) fee not to exceed $250 plus shipping expenses
for the evaluation of returned product found to be ineligible for warranty.
10) Return product must be sent in original packaging on pallets. Damage during transit that may occur by insufficient packaging will
be at the customer’s expense. Horizon Display can provide replacement packing materials for a fee.
11) The Horizon Display warranty gives you specific legal rights, and you may have other rights which can vary from locality to
locality. Horizon Display’s responsibility for defects and malfunctions is limited to the repair or replacement as set forth in this
warranty statement. All express and implied warranties for the product, including but not limited to, any implied warranties of, and
conditions of, and fitness for a particular and fitness for a particular purpose, are limited in duration to the warranty period set
forth above and no warranties, whether expressed or implied, will apply after the warranty period. Some localities do not allow
limitations.
How to Get Service?
Visit www.HorizonDisplay.com/Support for online assets such as video tutorials, updated user manuals, FAQs, and more. You may
also contact Horizon Display at (888)737-4674 or email (support@horizondisplay.com), Monday-Friday 9-5PM (PST). While on the
phone with the technician, every attempt will be made to resolve your issue. If the issue cannot be resolved, the Horizon Display
technician will provide additional instructions as to how to get the unit back to the original operation. This may include shipping the
unit back to Horizon Display’s Factory Service Center in San Clemente, CA. If a technician must be dispatched and the unit fails because
of issues related to software, operating system, and/or operator error related the client may be billed for time and travel expenses.
If a product is being returned to Horizon Display an RMA and instructions will be provided.
RMA INSTRUCTIONS
RMA Instructions
Requesting Support
1. Prior to requesting an RMA please contact Horizon Display by email at support@horizondisplay.com or call (888) 737-4674, Monday-Friday 9 a.m. – 5 p.m. (PST).
2. While with the technician, every attempt will be made to resolve your issue. If the issue cannot be resolved, the Horizon Display technician will provide additional instructions as to how to get the unit back to the original operation. This may include shipping the unit back to Horizon Display’s Factory Service Center in San Clemente, CA.
3. If a technician must be dispatched and the unit fails because of issues related to software, operating system, and/or operator error, the client may be billed for time and travel expenses. If a product is being returned to Horizon Display an RMA and instructions will be provided.
RMA Instructions
1. Contact Horizon Display to request an RMA form be emailed to you and then email completed form to support@horizondisplay.com.
2. Do not ship the defective product(s) until you receive an RMA number from Horizon Display.
3. RMA requests are responded to within 2 business days.
RMA Contact Information: support@horizondisplay.com Tel: (888)737-4674; Monday – Friday 9 a.m.-5 p.m. PST
Returns Policy
1. Horizon Display will reject any RMA returned without a Horizon Display RMA Number written clearly on the box and the air waybill.
Horizon Display
RMA Department (DRMAXXXXXXXX)
232 Avenida Fabricante, Suite 111
San Clemente, CA 92672
2. Please do not return product accessories (e.g., power supplies, cables/cords) unless specifically requested by Horizon Display.
3. Horizon Display must receive the product within ten days of the issuance of the RMA number or the RMA number will be canceled.
4. All materials will be subject to inspection before a credit is issued. Merchandise returned in poor condition may be rejected.
5. The customer is responsible for freight charges back to Horizon Display. Horizon will not accept COD returns or 3rd party returns.
6. Warranties are void if manufacturer serial numbers have been removed or the product has been damaged or altered.
7. Restocking Fee may apply under certain circumstances.
Packaging Requirements
All returned displays and accessories must be packaged in original factory or equivalent packaging. Any displays or accessories returned that are damaged are not covered by Horizon Display’s limited warranty. The customer is encouraged to keep the original packaging provided when the unit was first delivered. Horizon Display can provide packaging materials for a fee.
FAQ'S
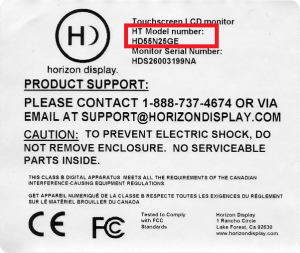
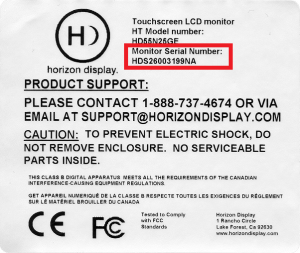
How do I find my touch monitor's model and serial number?
The product’s model number is indicated on the Horizon label affixed to the back of the product.
The product’s serial number is indicated on the Horizon label affixed to the back of the product.
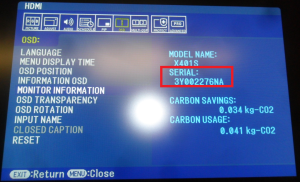
If the Horizon label is not accessible, the monitor’s serial number can be viewed on the OSD menu.
- For touch monitors using an NEC monitor:
- Press the MENU button on the monitor control panel or the monitor remote
- Go to “OSD” then scroll down to “MONITOR INFORMATION”
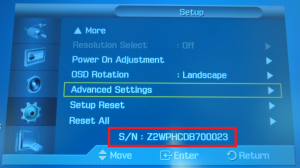
- For Samsung monitors with model numbers that has the first 3 characters as numbers (i.e. 400FP-3, 550EX, etc.)
- Press the MENU button on the monitor control panel or the monitor remote
- Go to “SETUP”
- Then scroll down all the way to the bottom until you see the serial number info
- For Samsung monitors with model numbers that has the first 2 characters as letters (i.e. ME55A, UE46A, etc.)
- Press the MENU button on the monitor control panel or the monitor remote
- Go to SUPPORT > CONTACT SAMSUNG
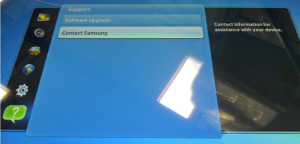
- Press the ENTER button to display the Product Info window which would indicate the monitor’s model and serial number
How do I determine what technology my touch monitor uses?
Located near the touchscreen’s USB cable plug is a colored zip tie which would indicate what type of technology the touchscreen uses.
| Touchscreen Manufacturer | Touch Technology Type | Zip Tie Color |
| PQ Labs | Infrared Touch Technology | Orange |
| IDS Pulse | Infrared Touch Technology | Blue |
The touch technology can also be determined via the model number. The 8th character (from the left) on the model number indicates what type of touch technology the unit uses. If the 8th character is a number, use the 9th character.
| Touchscreen Manufacturer | Touch Technology Type | 8th or 9th Character on the model number |
| PQ Labs | Infrared Touch Technology | “Q” |
| IDS Pulse | Infrared Touch Technology | “G” or “I” |
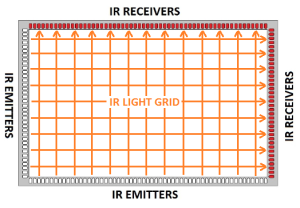
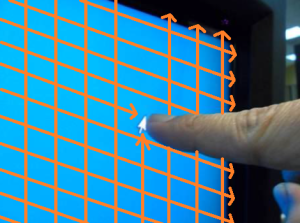
How does the touchscreen on my touch monitor detect a user's touch?
Infrared light hovers above the glass substrate. Shown below is an illustration of the IR grid that is projected from LEDs going all the way around the viewable area. If items (finger, stylus, or random object) break the IR beam of light it will register as a touch point.
How do I find out how many simultaneous touch points my touch monitor detects?
Multi-touch gestures is a feature of the Operating System and software/application that’s being used in conjunction with a touch monitor that’s capable of detecting 2 or more simultaneous touch points.
Mac OS and Windows XP only supports single-touch and as such does not have multi-touch gesture support. Windows 7, 8 and 10 supports multi-touch gestures.
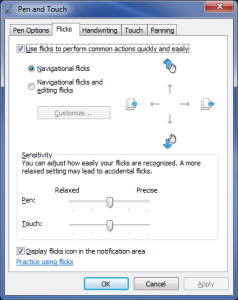
In Windows 7, the Pen and Touch feature which houses the “Enable multi-touch gestures and inking” setting can be viewed by going to START > Control Panel > Hardware and Sound > Pen and Touch. A quicker way would be to search for “Pen and Touch”
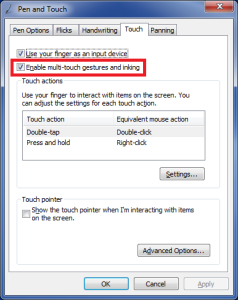
The Pen and Touch feature can also be viewed in Windows 8 and 10 but the “Enable multi-touch gestures and inking” setting is not available.
Does my touch monitor support multi-touch gestures?
Multi-touch gestures is a feature of the Operating System and software/application that’s being used in conjunction with a touch monitor that’s capable of detecting 2 or more simultaneous touch points.
Mac OS and Windows XP only supports single-touch and as such does not have multi-touch gesture support. Windows 7, 8 and 10 supports multi-touch gestures.
In Windows 7, the Pen and Touch feature which houses the “Enable multi-touch gestures and inking” setting can be viewed by going to START > Control Panel > Hardware and Sound > Pen and Touch. A quicker way would be to search for “Pen and Touch”

The Pen and Touch feature can also be viewed in Windows 8 and 10 but the “Enable multi-touch gestures and inking” setting is not available.
How do I connect my touch monitor to a computer?
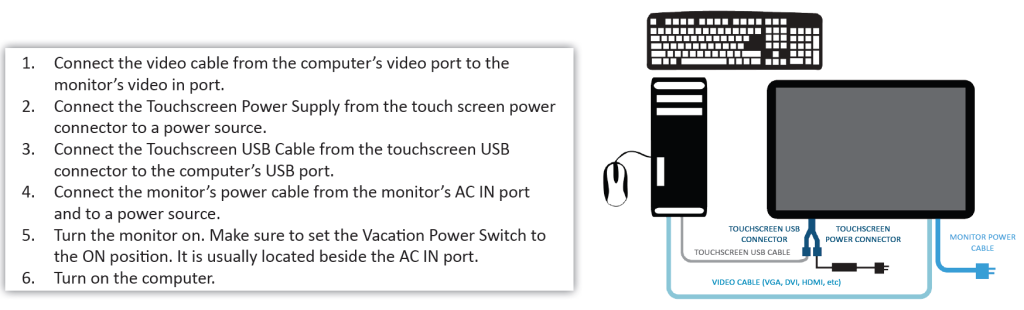
For touch monitors with touchscreens that require external power:
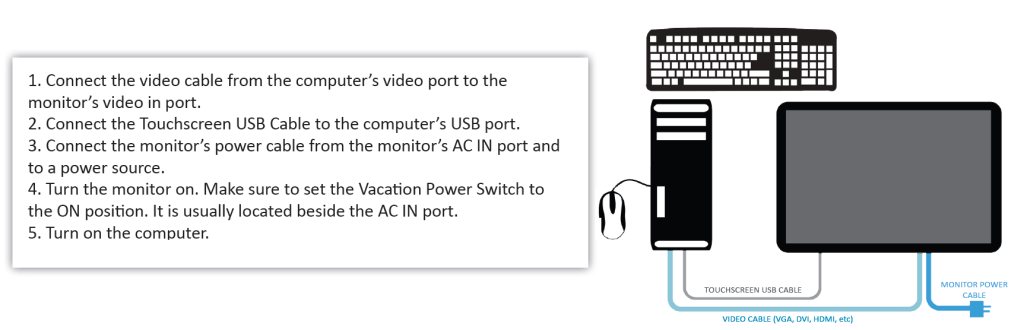
 For all other touch monitors:
Do I need to install a hardware driver on my computer for the touch monitor to function?
Touch monitors integrated with an IDS Pulse touchscreen does not require a hardware driver to be installed on the computer. These touchscreens are HID compliant and Plug-and-Play.
Touch monitors integrated with the newer model PQLabs touchscreens does not require a hardware driver to be installed on the computer. These touchscreens are HID compliant and Plug-and-Play.
Touch monitors integrated with the older model PQLabs touchscreens on the other hand, require that the touchscreen driver be installed on the computer manually. The touchscreen will not function until the touchscreen driver is installed on the computer. The touchscreen driver can be downloaded in the section below.
How do I calibrate the touchscreen for the touch monitor to function?
The touchscreens integrated on the touch monitors normally do not require calibration. But in the event that the touch is not accurate, a touchscreen calibration can be performed.
The touchscreens have their own touchscreen utilities which will enable you to perform a touchscreen calibration.
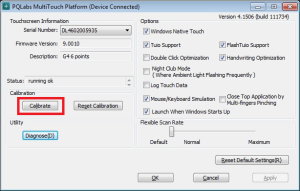
For touch monitors integrated with a PQLabs touchscreen, the touchscreen utility is automatically installed during the touchscreen driver installation. The touchscreen driver/utility can be can be downloaded in the next section below. A touchscreen calibration can be initiated by going to START > All Programs > PQLabs Software > MultiTouchPlatform, click on the “Calibrate” button then follow the on-screen instructions.
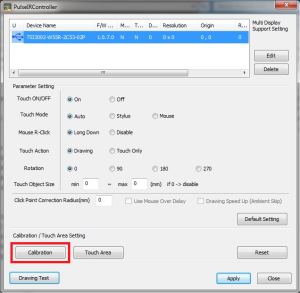
For touch monitors integrated with an IDSPulse touchscreen, the touchscreen utility can be downloaded from our website below. A touchscreen calibration can be performed by launching the PulseIRController utility, click on the “Calibration” button then follow the on-screen instructions.
How do I setup 2 or more touch monitors integrated with an IDSPulse touchscreen on one windows computer?
Before going through the steps below are a couple of info regarding this setup.
- The multi-monitor setup would only work in Windows OS
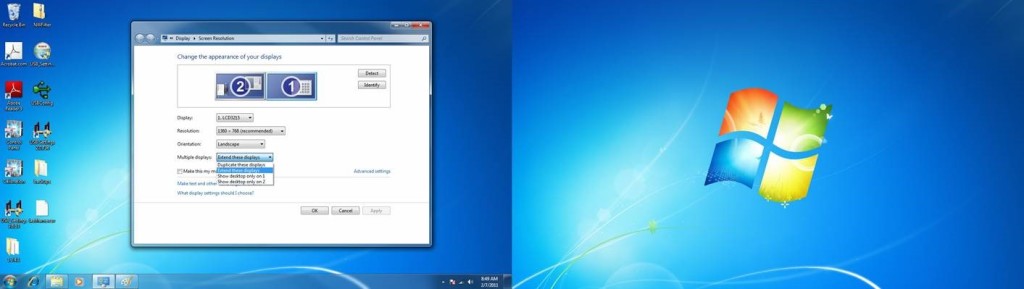
- Also, the multi-monitor setup would only work in extended desktop and not in stretched desktop. In extended desktop, each monitor has its own separate desktop and the Windows taskbar would only show on the primary monitor as shown below (FYI, in stretched desktop both monitors are being used as one whole screen wherein the Windows taskbar would extend over to the second screen)
- The touch monitor would first need to be calibrated individually and separately.
Following is the guide on how to set up multiple optical touch monitors connected to a single PC running Windows OS on extended desktop.
- First, with the computer turned off, plug in only the optical touch monitor to the computer (video and USB cable)
- Turn on the computer.
- Test the touchscreen to make sure it works and the touch is accurate. If the touch is not accurate, perform a touchscreen calibration. Launch the PulseIRController utility, click on the “Calibration” button then follow the on-screen instructions.
- After you have confirmed that the touch monitor works without any issues. Shutdown the computer.
- With the computer still turned off, connect all touch monitors (video cable and USB cable).
- Turn on the computer.
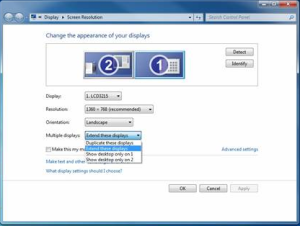
- Make sure that all monitors are set to extended desktop. If you are using Windows to manage your monitor settings, go to “Display” > “Screen Resolution” and setting the “Multiple displays” to “Extend these displays”.
- Do a quick test on the touchscreen to make sure that it is working by tapping on different areas of the touchscreen to see if the mouse cursor is following your touch. Please note that at this point, any touch made on the touch monitor would still register on the monitor that’s set as the main display.
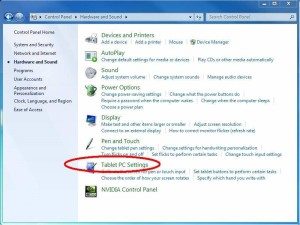
- Go to Control Panel > Hardware and Sound > Tablet PC Settings.
- Click on Setup.
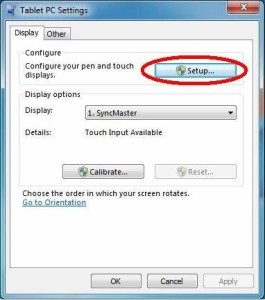
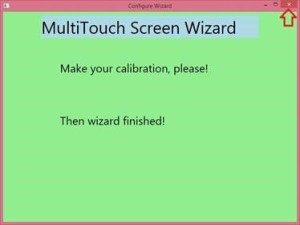
- The monitors should turn white with one monitor having a text at the middle of the screen asking you to touch the screen as shown below.

- If the monitor showing the text is the touch monitor, tap on the touchscreen. Please note that it may take a while of tapping on the monitor until it tells you to press Enter to continue as shown below. If the monitor showing the text is NOT the touch monitor, press Enter. Keep pressing ENTER until the text shows/displays on the touch monitor, then tap on the screen to identify it as a touchscreen.

- After the touch monitor has been identified, press Enter until the configuration setup exits.

- The computer should now be able to detect the touch monitor.
- Test the touch monitor to see if the mouse cursor would follow your touch.
How do I setup 2 or more touch monitors integrated with a PQ Labs touchscreen on one windows computer?
- Download and install the latest touchscreen driver/utility on your Windows 10/8/7/Vista/XP computer from the link below. Please make sure to uninstall any previous versions of the touchscreen driver/utility on your computer before installing the latest one.
http://multitouch.com/download/mt_driver_kit.exe
- Reboot your computer.
- Note down the corresponding touchscreen serial number for each monitor. See instructions on acquiring the touchscreen serial number from one of the previous emails below.
- Make sure that the PQLabs MultiTouch Platform utility is closed.
- Plug both touchscreen USB cables into the computer.
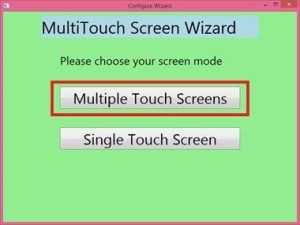
- Download the MultiTouch Screen Wizard from the link below then unzip and open the folder.
- Launch the PQWizard utility
- Select “Multiple Touch Screens”
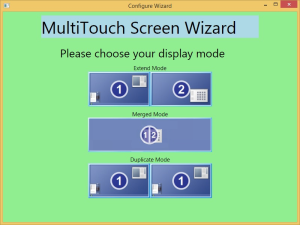
- Select the corresponding display mode for your setup.
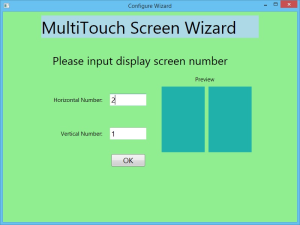
- Input the number of Horizontal and Vertical monitors then click on the OK button
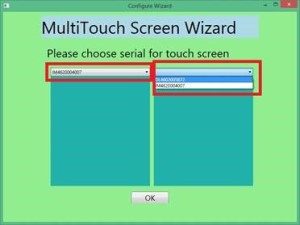
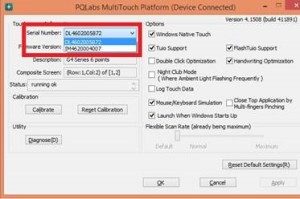
- Select the corresponding touchscreen serial number for each monitor position then click on the OK button.
- Close the MultiTouch Screen Wizard window by clicking on the “X” button at the upper right corner of the window.
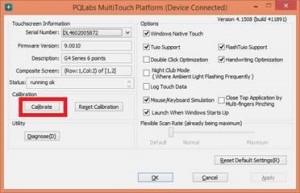
- Launch the PQLabs MultiTouch Platform utility by going to START > All Programs > PQLabs Software > MultiTouchPlatform
- Calibrate the first touchscreen by clicking on the Calibrate button. Follow the on-screen instructions.
- Calibrate the succeeding touchscreens one at a time by selecting its serial number then clicking on the Calibrate button. Follow the on-screen instructions.
- Click on the OK button to close the utility window.
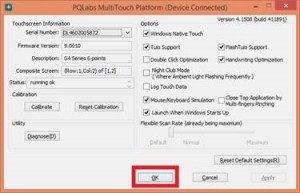
- Test the touchscreens for proper touch response.
How do I connect my touch monitor to a computer that's more than 15 feet away?
Touch monitors that are more than 15ft. away from the computer can be connected via the use of active USB cables or powered USB hubs. Below is a list of active USB cables and powered USB hubs that have been tested to function properly with the touch monitors.
Can direct sunlight affect my touch monitor's performance?
Yes.
How do I remove the black borders on the touch screen when I use the HDMI video input?
For units using an NEC monitor, the OVERSCAN setting can be turned off to address this issue. Press the MENU button on the monitor or remote then scroll to ADVANCED > OVERSCAN, select “OFF” then press ENTER.
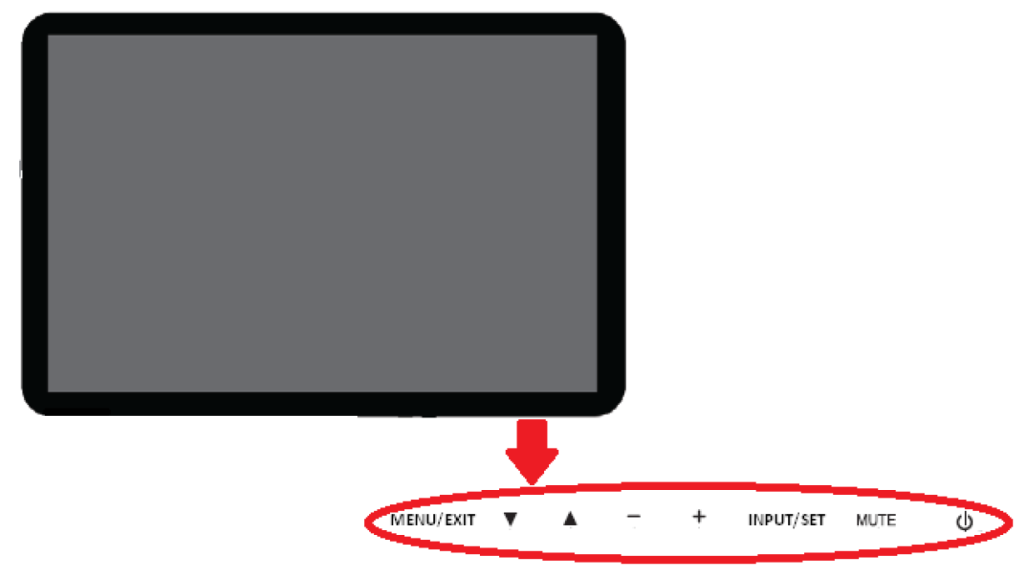
What are the button assignments using an NEC monitor?
Below are the button assignments for units using an NEC monitor.
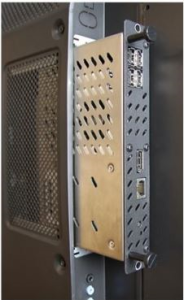
How do I setup an Open Pluggable Specification (OPS) PC to work with my touch monitor?
- To install the OPS PC:
- Power off the monitor
- Set the monitor’s Main Power Switch or Vacation Power Switch to the OFF position
- Unplug the monitor’s power cable from the power source.
- Install the OPS PC on the monitor.
- To power on the monitor:
- Plug the monitor’s power cable into the power source.
- Set the Main Power Switch or Vacation Power Switch to the ON position.
- Turn on the monitor by pressing the power button on the monitor control panel or on the monitor remote.
- Set the monitor’s video input to “OPTION D” by pressing the SOURCE button either on the monitor control panel or on the monitor remote.
- Wait for the OPS PC to finish booting up the Windows OS.
- To power off the System (monitor and OPS PC):
- Shutdown the Windows OS by going to START à Shut down
- Wait until the Windows OS fully shuts down and the LED power indicator on the OPS PC is unlit
- Turn off the monitor by pressing the power button on the monitor control panel or on the monitor remote.
* For advanced power configurations refer to the monitor manufacturer’s user’s manual under “OSD Advanced Options”
** For advanced Remote Control of the monitor via RS-232 refer to the monitor manufacturer’s user’s manual under “Controlling the LCD monitor via RS-232C Remote Control” and NEC’s PD Comms Tool software.
How do I get technical support for my touch monitor?
- Call (888)737-4674 or email support@horizondisplay.com (Monday – Friday 9AM-5PM PST) to request for technical support.
- Please have the following information ready:
- Product’s Model Number (indicated on the Horizon Display label affixed to the back of the product)
- Product’s Serial Number (indicated on the Horizon Display label affixed to the back of the product)
- Description of observed issue on the product
- Depending on the reported issue on the product, the customer may be requested to provide additional information pertaining to the issue and/or perform a few troubleshooting suggestions in an attempt to confirm that the product requires service.
How do I annotate with a Horizon Display touch screen?
- Below are a few web links providing information on how to annotate using a touch monitor.
https://www.youtube.com/watch?v=U44Pum7e8mEhttps://support.office.com/en-us/article/Use-ink-on-a-Tablet-PC-1b8196b3-2102-4152-875b-5305f0c79ea9?CTT=1&CorrelationId=cd5606b6-7d6e-4921-8669-707beb7ce974&ui=en-US&rs=en-US&ad=US
How do change the way the touchscreens responds to touch gestures such as a double-click, right-click, flicks, etc.?
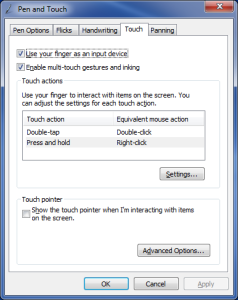
- In Windows 7, 8 and 10, the Pen and Touch control panel houses the touchscreen gesture settings which allows you to adjust settings such as double-tap (Double-Click) speed, press and hold (Right-Click) duration, etc. Some touch gestures can also be disabled via the Pen and Touch control panel.
The Pen and Touch control panel can be viewed by going to START > Control Panel > Hardware and Sound > Pen and Touch. A quicker way would be to search for “Pen and Touch”.
What does HID-compliant mean when it refers to hardware drivers?
- In Windows 7, 8 and 10 operating systems, HID-compliant devices automatically install a universal driver in when it’s connected to the computer. It does not require the manual installation of a hardware driver. Some Android devices also support HID-compliant devices and does not require the manual installation of a hardware driver. Mac and Linux operating systems does not support some HID-compliant devices and as such, may require the manual installation of a hardware driver.